The Low Spot
The Low Spot
Last Saturday we had the South Side Skirmish Wargaming meetup at First Aid Comics. I was really looking forward to this since the doubles tournament, due to wanting to focus on proper 1v1 Kill Team with an added bonus of playing again against Knut now that were both a bit more experienced. Upon arriving we ended up rolling to play Volkus layout 4 (fig A) with knut getting initiative for placement and taking the orange deployment zone.
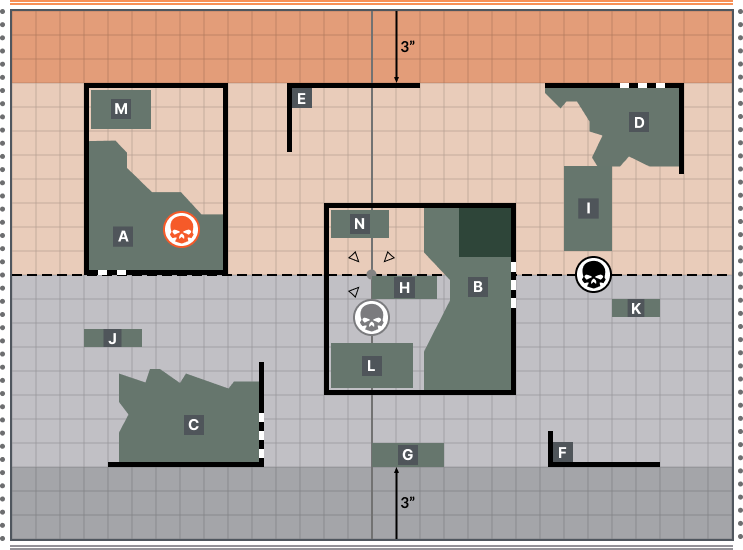 Figure A, Volkus 4
We randomly picked Stake Claim for our Crit Op, and in my head I was prepared to play Kill Team, so I selected Kill Op as my Primary Op, while I also wanted to try something new, selecting Plant Banner as my Tac Op. My initial plan was to use the squigs to lock down the left side of the kill zone while using my rocket men to control the right, leaving me my melee operatives to hold down the stronghold in the middle for at least one easy crit op point. This is where I made my first major follies of the day; I had set myself up for a loss as soon as I placed my barriers. I had been super aggressive, with the thought that I could get my boss and 'eavy rocket placed near Knuts deployment zone to potentially shut down any movement behind the middle stronghold. My second barrier did little to no better as we will soon see in turn 1.
Turn 1
 Deployment and barrier positioning
I won initiative for Turn 1 and already I am making mistakes, things like not giving enough Command Points to each player during setup, but don't worry, this game doesnt last long enough for it to matter! For my first move, I take my left most squig and push forward to my barrier right in the middle of the map. I thought I'd be in complete cover, alas Knut's first turn was to move up and wipe that squig off the map. It explodes, thankfully, but gives 0 wrecka points, setting the tone for the rest of the game. I burn a few turns getting my melee characters into the stronghold in the middle while Knut moves character onto both objective side objectives.
Noticing that a few Angels of Death are grouping up on the left side, I figure its the pefrect time to use up my Pulsa Rokkit and get my Wrecka Point roll going. I drop it right in the middle of 3 enemy operatives and roll well, but no crits, meaning I do a little damage to 3 enemy operatives and stunt their movement while not generating Wrecka Points.
A short aside about Wrecka Points. Wrecka Points are a system specific to the Wrecka Krew killteam, where every time you roll a 6 when you attack, you gain a Wrecka Point. You can then spend these points to convert any attack failure into a success. This is the economy the Wrecka Krew lives and dies by.
I move my Demolisha up to the stronghold on the left, leaving myself my Boss, my Gunner, and one last squig. I move the Boss forward aggressively to my barricade on the right objective, followed by my Gunner next to, but not within blast range him. Lastly I move my squig up to cover behind the center stronghold, feeling overall good about my first turn.
Turn 2

Start of turn 2
I lose the initiative for this turn, which is the first crumbling of what I am thinking is going to be a great game for me. Right off the bat, Knut rushes my Gunner and wipes him off the map in one activation. I think attempt to use my Squig to retaliate, but manage to run up, bite his ankles, die, then not explode. Great.
Immediately, Knut responds my pushing a second operative up and wiping my boss off the map. Double Great.
Having had a third of my team wiped off the board while only doing 4 damage, I figure my Rokkiteer can hop up ontop of the terrain in the bottom right corner and hit the Thousand Suns liveried marine. Magically, I roll no damage. Triple Great.
Knut moves his Hello Kitty themed captain forward to cover the left objective, so I take that as an opening to use my Demolisha and charge into an attack. Keeping in theme with my rolling for the night, I deal more damage to myself than the captain, but luckily I take the captain with me. This leaves me with only 2 models on the table, and they're both standing next to eachother. Quadruple Great
Like a shark smelling blood in the water, Knut sends his remaining operatives directly into that Stronghold. I roll decently for the first time in the night take out 2 operatives while only losing one, but mortally wounding the other. That ends turn 2. I have one model on the table with 4 wounds left. Pentuple Great
Turn 3
 Start of turn 3
This turn felt like a formality honestly. All I could do is wait for the space marines to get to me and make literally any hit. Knut lobbed a grenade and ended my suffering.
A Post Mortem
This game was death by a thousand cuts on my end. The worst part is that I didn't even have any idea until it was all said and done. My first mistake was placing my barricades expecting them to provide better cover than they actually provide, as well as positing them on objectives, as opposed to a more reserved halfway point from the deployment zone. My second mistake was rushing my ranged operatives into a situation where melee was inevitable. This can be avoided easily with only the least amount of thought. I didn't get far enough to really take anything else away, but I feel these 2 lessons are huge.
I have played 2 games since then, which I am about to write a post for, but it feels like a different enough vibe that it should be its own post.

Also, because Knut is a really nice and cool guy, he surprised me with a gift of 3D printed ork themed barricades pre shaded! Super cool, and something I look forward to painting up and using in casual games. I just would feel bad if they allowed me to do something weird in a tournament.
-j